testing, 1.2.3
am i back?
Leave a reply
testing, 1.2.3
This poor blog only gets updated when it’s my month for the bee. Oh well. Here we go!
I know May ends up being short so no worries if you don’t get back to me until we meet in July.
Until we meet on the 11th, I’ll give you some time to think about what you want to make. I’ll be giving you some blue fabric for the background, and some yellows and whites for the foreground. Feel free to add in your own fabric, please yellows/whites only, no other colors. White on white is ok.
Here’s what I’m thinking – a starfield of all different stars.

I would love for you to Bee Adventurous. Any star will do, but I’m going for a more traditional look rather than a wonky/improv look, so feel free to google STAR QUILT BLOCKS and see what comes up.
Here are some ideas:
Please make two different stars and two different sizes. You can use the same fabrics in each or mix it up. Anything from 8” to 16” is fine – it doesn’t have to be an even number, just square. If you have some idea to make a shooting star that ends up rectangular, that’s ok too, but generally square.
You will also find a piece of fabric ironed to some freezer paper. Since May is my birthday month, this quilt will be for me and I would love to label it with all our your names, so please put your name, city, date and any other message you would like on there with a fabric pen like a Micron Pigma or something that you think won’t wash or iron out!
Thanks so much and I’m so excited to see what you come up with!

When I was a child, I used to visit my Grammy and Grampy in Saint John, NB. My Grammy had a maple leaf quilt on her guest bedroom and I loved that quilt. My Grammy died a few years ago, and my aunt got the Maple Leaf quilt, but I never stopped thinking about it. I’ve wanted to recreate it for years, but I could never quite find the right leaf shape. Hers looked like a real flag leaf, not the stylized half-square triangle leaves I’ve seen online.
Recently I saw a scrappy, multi-colored version here, http://naptimequilter.blogspot.com/2013/03/oh-canada.html and that got me going to try and find the leaf I was looking for. I found an image of the leaf and traced it in EQ7, and broke it down into manageable pieces. I still want it to be all red, not multi-colored like hers, but it was the inspiration to get me going again.
Now that it’s my month for the BeeAdventurous bee of the LAMQG, I’d like you to make me two maple leaves so I can re-create my Grammy’s quilt. Thank you for helping me make this quilt that I’ve had in mind for so long.
There are tons of foundation paper piecing tutorials online, so you can search for a tute or a video online to show you how to do it if you aren’t familiar with the technique. This one is really good, but requires you make a copy of the pattern and cut it up, but otherwise the instructions are great. Here’s another with some good tips, too.


I broke this down into manageable pieces to make it easier to assemble.
The basics:
Starting with section A, you just put your largest piece of fabric on the back of that piece and put it aside until you join it together. Baste it right to the paper for a more stable assembly later, and for trimming it. (This image shows the piece I made by joining two fabrics. You don’t have to do this.)


Section B starts with a small red piece and a larger white piece.

Section C is a little more complicated that section B. Start with pieces 1 and 2 and trim before adding piece 3.

Sections D and E are similar to section B in their piecing.


Sections F and G are the most complicated sections, and they are really not that hard, just start with piece 1 facing up, then lay piece 2 face down, making sure it covers all of section 2 when you fold it back. Sew the seam on the line between 1 and 2, fold #2 back to make sure it covers the whole area, then fold it back over area 1 and trim off all but the 1/4” seam allowance.

Keep going in numerical order, adding the next piece face down, checking and trimming until the whole section is done.
When all of the sections are done, lay out your sections in the leaf shape.

Join section C to B.
Join A to the top of BC

Join E to G and join F to D.

Join ABC to EG. This is where the pinning intersections comes in really handy. I also pinned along the seam allowance to make sure nothing escaped out the sides of the paper.


Join ABCEG to FD. Here’s the back of the block and you can see the seams are pressed open.

You’re done block 1! It should measure 12.5″, but if it’s a little shy or ragged, don’t worry, I plan to shave the blocks down to the same size all around.
Please make two blocks.
If you need to print out a new template, you’ll find it here: Maple Leaf. It prints on US Legal paper (8.5 x 14″).
Thank you!
adnohr
Last week, my husband came home from picking up my daughter from school and informed me that my lovely daughter had flushed another child’s mittens down the toilet.
So, I went to my daughter’s room and found the mittens I had made for her last year (and she had never worn) and informed her that she would be giving them to her friend at school, since she no longer had mittens. You would have thought I had ripped her hair out from the howling that followed. After a loooong night and morning, we brought her to school and I had her ask her teacher to put the mittens aside for when the other child arrived, and for her to ask my daughter to give them to the other child. She wasn’t happy about it, but she did it.
Now, for the past few days, it’s been in the 30F in the morning, which is pretty unusual around here, and my daughter has no mittens. I took her to the store and we picked out some fleece and put it in my studio and forgot about it for a few days while I thought about pyjamas and then the pretty dress from yesterday.
This morning, it was cold again, and as we got in the car for school, my daughter immediately removed her coat and then started howling again, this time because she wanted to wear gloves. She doesn’t have any gloves and we did the opera of “I wanted to wear gloves” “You don’t have any gloves, buckle your seat belt” back and forth until I got out of the car to insist. Once she calmed down, I reminded her of the fleece and told her I’d make her some mittens tonight after supper.
So I did.

Oh, and if you think I exaggerate about the nudist comments – on Saturday, my husband came back from his run in sweats and hat and gloves to find me in sweats and hoodie in our 60F house, and there was my daughter in a bikini. “What are you wearing?” my husband asked. “I’m a Bubble Guppy” (a nick jr. mermaid show). “I’m choosing my battles today”, I said. “OK, but if CPS shows up, you handle this” he said to me.
I don’t know when I last posted, but it was a long time ago. Whatever.
I was planning to make some pajamas for LaLa and got the pattern all cut out and was about to cut the fabric when… yikes! I realized that the flannel I was planning to use has not been pre-washed. That could have been a big waste of time, money, and fabric. Instead, I threw the fabric in the wash and then was sulking a bit in need of instant gratification.
I looked through the book I was using for the pjs, and found a dress that looked cute, and I knew I had the fabric for it, and that it was pre-washed.
I had bought this fabric when LaLa was about 2, but never had a pattern for what I wanted, which was a floral bodice and the stripy skirt. I’m not confident enough in garment sewing to wing it, so I just stashed the fabric
So I found the pattern today. It’s from Weekend Sewing by Heather Ross and its called the Flower Girl Dress. I had a lot of problems with the pattern, but I went from start to finish in 3 hours, including removing the bodice, redrafting it a bit larger, and remaking it. Not bad!

I did have LaLa try it on, and she wants to wear it tomorrow, even though its been in the 40s here. She’s a bit of a nudist, or at least loves to wear dresses if she wears anything at all.

Playing around with possible color layouts. Not sure if I’ll do this block or not.
I don’t know, sounds like a good name for this block, right? It’s like an exploded Friendship Star.

May is my month for the Seams Perfect - A Modern Scrap Bee and it really snuck up on me. I had been mulling around a bunch of different blocks when I saw this one on Saturday. It was in a photo album on a Yahoo group and the woman who made the quilt said it was made out of jelly rolls. I really liked the layout but a quick look told me it was a 7-grid block, and 7x jelly roll (2 inches finished) would make a 14 inch block. So, I opened up EQ7 and drafted it out and they came out to 2-1/4 inch strips for this block. That’s all fine and dandy, but that means all the other measurements are a little odd too.
But don’t panic, I’ve laid out the whole thing and if I can do it without making a mess, you can too.
Here’s how you make it.
You need three prints and one solid.
Cut the fabrics into these pieces:
With Color B, you need to cut 45 degree angles, so use a ruler with a 45 degree angle line on it.
Cut the strip in half, and stack both strips right side up on top of each other. If you don’t do this, half of your pieces will be going the wrong way.
Measure 4-1/4 inch from the right side and mark it on the bottom of the strip. 
Line up the 45 degree line along the bottom edge of the strip, and cut along the side of the ruler to the top of the strip. That makes 2 chisel shapes.

Next, measure 4-1/8 from the bottom where you just cut, line up the 45 degree angle again, and cut.

That makes 2 parallelograms.

Repeat with 2 more paralellograms, then measure 4-1/4 inches from the cut line along the top of the strip, and cut straight down to create 2 more chisel shapes.

You can discard the remaining Color B.
Sub-cut the 6 solid squares in half on the diagonal to create 12 Half-Square Triangles.

The remaining pieces are all rectangles as described above, so I didn’t photograph them.
Assembly
Lay the triangles on the chisels as shown. You should have a dog ear on the short side of the chisel.

With the parallelograms, lay the triangles the same way – with the edge and hypotenuse aligned, and a dog ear on the opposite side.

Sew with a 1/4 inch seam allowance. If you start at the point, you should cross the dog ear. Hopefully you should be able to see what I mean in the photo.

Press toward the color on both the chisels and the parallelograms.

Cut off your dog ears for easier sewing to the next pieces.
Lay out your shapes to get your bearings.

Lay the solid on the chisel piece, and sew along the long side of the chisel.

Press towards the darker color. Keep building out, log cabin style, pressing towards the color.


Sew each of the four corner quadrants and lay it all out again to get your bearings.
Sew the horizontal parallelograms to the quadrants below them.

Sew the center square to the parallelogram below it.

Sew the center/parallelogram to the corner quadrant on the right.

Press open and sew the left corner quadrant to the center/parallelogram.

You can see above that my piecing wasn’t perfect. If you need to square up the corner quadrants, they should measure 5-5/8 inches square, which is the length of the longer Color A piece.

That looks much better after I trimmed of that piece.

Join the top two corner quadrants to the remaining parallelogram piece in the center.

Join the top and bottom pieces together.

Ta da!

Pretty close to 12-1/2 inches square!

Don’t freak if yours doesn’t come out perfect, I’ll put sashing between the blocks so there’s room for error. I’m actually amazed mine worked out so well!
Since my layoff in October, I’ve been working on Christmas gifts for my daughter and her cousins. This post is a roundup of what I made for La La.
Since turning two this year, I’ve noticed, and her teachers at day care have also observed that she’s been enjoying being a little mommy to her baby dolls. Her teacher has sent photos of her giving her baby a bath with the other kids and here she is way back in March helping her baby to go to sleep.

At home too, I’ve observed her putting her babies in my shoes like little cradles, putting her babies to sleep on pillows and patting them to sleep, and leaving the room with the white noise machine on and some music so they will fall asleep easily. (This is her routine, white noise and nature sounds, although recently she switched to music instead).

She then tells daddy and me to be quiet so her babies can sleep. Yia Yia gave her a bottle for the baby she gave her last Christmas, and she plays with that a lot too.
Since she has been such the little mommy, I thought I’d give her some tools to help in her play.
I found this great tutorial for making all kinds of pretend-play toys and this set was perfect: a diaper bag, wipes, and diapers, sized for the baby doll she got for Christmas last year from Yia Yia. I actually didn’t make the diapers exactly the same, but used her pattern as a guide for cutting the fabric. I also didn’t make her doll bassinet and changing pad, because I already had a bassinet of my own in the works and I also made a quilt for the doll, and I didn’t want to go crazy with all the other stuff I was making.
So, here’s the diaper bag.

And the wipes. So clever, you can fold them so they pop up! I used blue felt because all of our wipes come from Costco and come in blue packages, so it’s more realistic.

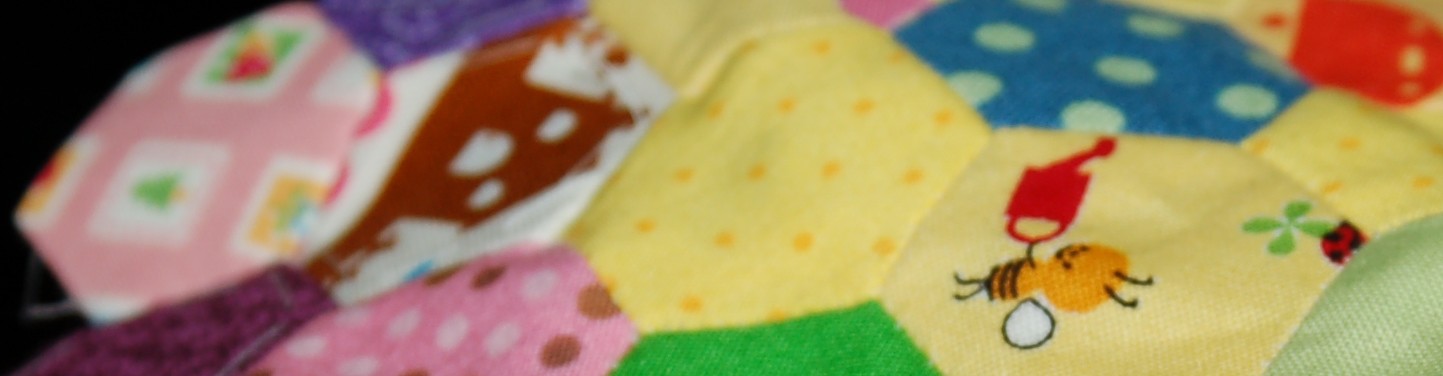
Here’s the quilt. It looks like I pieced the whole thing, but it was actually a cheater with space between the 2.5" squares. I had bought the fabric thinking it would be perfect for 1" hexagons, but I used a little bit for this quilt. I used the method described here, but of course without the interfacing.


Here’s the bassinet. I started this back in July. It’s all hand stitched and hand quilted. I had to figure out how to make it curve at the ends, which I did by using hexagons, pentagons and diamonds. It’s lined with white cotton over a piece of batting I got in a sampler at the quilt festival over the summer.


I really learned a lot while doing the hand quilting – though mainly I learned that it’s a slow process and you really can make better progress when you have the right tools. I broke one embroidery hoop before I ended up buying a quilting hoop, and tried several different needles before settling on the smallest ones I could find, size 12.
In addition to that stuff, the mom of one of her cousins asked for new clothes for the dolls I made them last Christmas because they really enjoy playing with the dolls. So I made clothes for all the dolls, including La La’s.
I made this top and skirt with fabric that has all these "T" words, describing two year olds. I only have a year to use the fabric, so now’s the time.

I also used that fabric to bind her quilt, since it matched the purple nicely.

I made this t-shirt, and a jumper out of corduroy. I haven’t really sewn with knits before, and discovered that the right tools make all the difference again – mainly the right needle for knits really helped.

Next up is a pair of pajamas made of flannel, with coordinating cuffs.

Also, I forgot to photograph them, but I made her baby some new shoes out of vinyl, so they look like brown leather shoes.
Over all, I think La La really liked everything, but the things I see her playing with most are the wipes and the bassinet, which she seems to think is a changing pad. That’s ok, as long as she has fun playing with it, that’s all that matters to me.

She got the same baby this year from her Grammy, and was very excited to have two of the same baby – "Sisters!" she said. So now she has two diapers to change whenever one of them ‘poops’ as she likes to tell me. 🙂


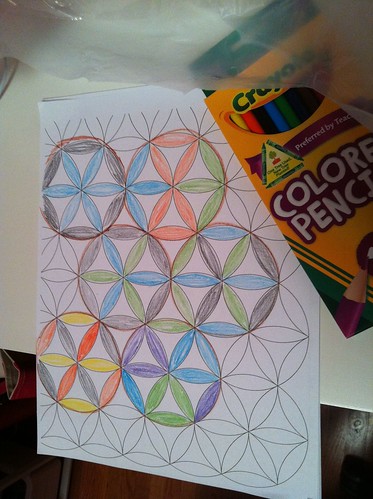
So, I mentioned that I got sucked into the hexagon thing.
Really, I’m loving it so far, and have just started hand quilting the hexies in the doll bed I’m making for my daughter with the .75 in hexagons. Figuring out the hand quilting has been a trip though.
They (hand quilters) have this magic rocking thing they do to make perfect stitches. Me, not so perfect.
I tried it, and realized quick that I needed a thimble so went back to the store for a couple of different types and settled on a nice clover coin thimble. It’s mostly working well, except that first stitch in a set is a doozy.
I did a search on youtube to find some examples of hand quilting in action, just so I could get the rhythm. What I found was so much fun! At first there were just a few videos of old women chatting and not very closeup videos of their hands. Few more clicks, and a little better, then I found this woman’s vlog. From what I can tell, she’s an 80ish year old woman who is just finishing up a quilt that she started with the leftovers from her 6 previous quilts, something that she has done 3 times before. And not a little throw either, but a huge at least queen size. And she set it up on her frame and hand quilted the whole thing. All the while videoing herself, editing them quite nicely and adding music etc. (She probably has a mac!) And what an interesting woman! I’ve subscribed to her stream and plan to go back and find out more about her. I hope I’m as witty and insightful when I’m her age.
Anyway, I’ve backed my hexie quilt with some white Kona muslin and am working my way around the thing and maybe it will be done for Christmas. La La has seen it, so its not a surprise, but she doesn’t know what it is.
Meanwhile, I’ve been laid off from my job (outsourced, really) so I’ve been working on Christmas presents for the kids. Y and M’s mom mentioned that the dolls I made for them last year are still very much played with, and that the kids would love some more clothes. So that’s what I’m making – lots of clothes. A & B’s mom gave me some hints too, so they are also getting more clothes, but someone might be getting an American Girl doll from Santa, so really instead of 5 dolls’ worth of clothes, I’m making 6. A’s clothes will be half for the new doll and half for the old. Maybe a couple of matching outfits for both, if I can hack it. So far, I’ve made some pretty adorable flannel jammies, a purple outfit for one doll, 2 pair of overalls for the boy dolls, and one pair of jeans. Next up will be some t-shirts, which should be interesting, since I’ve not really sewn knits before, at least not successfully! But since I knew that, I bought plenty of extra yardage of the knits, just in case. I don’t think I’ll have to wait til after Christmas to post photos, but I haven’t taken any yet. I don’t think the kids read my blog yet ;-/
When I have a few completed outfits, I’ll post. Sadly, I don’t have an AG doll to try out those outfits, so I’ll only be able to have a model for the Wee Wonderfuls dolls.
I happened upon this yesterday and with perfect timing.
The Train To Crazy: Using Freezer Paper to cut out patterns {a tutorial}.
With Christmas coming, and my unemployment coming in less than 3 weeks, I’ve been thinking about what I can do to make a homemade xmas again this year.
Last year I made the wonderful Wee Wonderfuls dolls for my daughter and the cousins. This year, the 5 yo girl cousin is in need of some clothes for that doll, and her Groovy Girls and maybe something coming from Santa that is about 18″ tall (wink), and I’ve got plenty of interesting fabric so I know I can make a nice good bunch of outfits. Maybe matching for all three dolls?
Anyway, I’ve got one sewing pattern already, and was thinking about it over the weekend. Last night I saw Andrea’s posting in my google reader and thought, “hmm, interesting idea, but I never use patterns”. Um. Yeah.
So, I had a good night’s sleep last night, La La didn’t wake up before the alarm, which is always a good thing, so I guess my brain was able to make the connection that I missed when reading it last night.
I got the little lamp out of La La’s room and took the shade off and placed it under the coffee table. I opened up the pattern and got out my roll of freezer paper and a pen that I like and started tracing.
And quickly realized this was not going to work for me. I was not comfortable all hunched over, there was too much detail on the pattern piece and I haven’t used a commercial pattern in so long, I wasn’t sure what was important. But then I had an idea!
I’m a gadget girl, so I’ll use my gadgets! I cut up my freezer paper into 8-1/2 x 11″ sheets, took the curl out with an iron, and then photocopied the pattern pieces onto the freezer paper.
Genius!
Don’t you love the internet??